The post Flight Sims for the Win: It’s All About Repetition and Drill appeared first on FLYING Magazine.
]]>The beauty of the ATD is that scenarios can be created and adjusted to compensate for the learner’s changing skill level. It can also be reset with a few keystrokes, providing a more expedient learning environment. Here are a few scenarios that you might find useful.
Scenario 1: The Pattern
The pattern can be very intimidating to a learner. It can also be dangerous when the learner drops the airplane to fly the checklist or radio, so practice in the ATD is often a good way to learn procedures, as the ATD is a CFI-controlled environment.
To get the most out of the scenario, the learner should use the same procedures in the airplane.
Checklists need to be followed, and the appropriate power settings and aircraft configuration for each leg of the pattern should be called out and applied. Radio calls should be made too.
If the learner is having trouble remembering what comes next, press the pause button and discuss the options. The CFI can increase the complexity of the scenario by changing the winds or refusing to engage the pause button. This is like playing a piece of music on a piano from one end to the other: You may hit some sour notes, but you will learn.
Pro tip: If the ATD does not have side-view screens, the CFI should remind the learner that each turn they make will be in 90-degree increments. Note the 90-degree marks on the heading indicator as these help with orientation. If utilizing Runway 17 with left traffic, the crosswind turn will be heading 080, downwind 350, base 260, etc. This can be very helpful when the learner goes to unfamiliar airports and isn’t sure what headings to fly in the pattern.
Make sure the learner focuses on altitude control in addition to headings. Don’t accept the excuses of “I can’t fly if I can’t see the runway,” or “I can’t feel the airplane.” It’s an ATD. You’re not supposed to feel it like you do the aircraft, but this can make you a better pilot as you will develop instrument scan and interpretation skills. This can greatly improve landings as you will be ahead of the airplane and nailing the airspeed and attitude on short final.
To change things up, the instructor can program a tailwind so the learner experiences this situation in a controlled environment, where running off the runway isn’t a big deal. We file this scenario under “This Is Why We Shouldn’t Do It.”

Scenario 2: Uncommanded Loss of Engine Power
This is the big kahuna of emergency scenarios, and if it happens in the real world, knowing what to do can be the difference between telling the story in the FBO lobby or having six of your best friends carry you in a box. The beauty of engine issues in the ATD is that they can be sneaky, just like they are in the airplane. Before the learner launches, the instructor can program the engine to lose power several minutes into the flight. This is usually better than tapping at the keyboard during the sim session because that puts the learner on notice that something is about to happen.
In the airplane, loss of engine power in training is done when the instructor pulls the throttle back. Real world, if the engine loses power, the throttle is probably not going to move. This can be confusing to the learner if they have a loss of engine power—they may not recognize it and simply be surprised they are losing altitude because the throttle position hasn’t changed. The ATD scenario fixes this misconception.
Partial power loss scenarios—especially at low altitude—are very useful. If a learner develops good habits for addressing the issue, that behavior will likely be automatic in the airplane. With intermittent power challenges, they should focus on troubleshooting using the appropriate checklist and decision-making skills—should we land or push on? Situational awareness is also stressed: Where is the closest airport?
For best results, don’t give the learner an engine failure on every sim session and mix up 100 percent loss of power with the occasional partial loss. The latter on takeoff is the most important. You don’t have the time or altitude to troubleshoot, so good decision-making and situational awareness is key. Learners can practice pitching for airspeed.
Always brief the land-straight-ahead scenario and at what altitude you will attempt the turn back. If you are flying with another pilot, insist on briefing who-does-what tasks in this situation. One of you needs to fly; the other takes the radios if appropriate.
Scenario 3: VFR into IFR
If you read the accident reports the National Transportation Safety Board (NTSB) compiles, you will notice a lot are attributed in part to the pilot’s decision to continue VFR into deteriorating weather. In the ATD the scenario begins by having the pilot check the weather before takeoff. The CFI creates a scenario with marginal VFR and a mission, like the pilot who is trying to get their airplane to the maintenance shop because it is about to go out of annual. Talk about how “get-there-itis” can make a pilot do foolish things.
These flights work best if they are limited to an airport 10 to 15 miles away. It’s just a few minutes, right? What could go wrong? Then the CFI slowly brings the weather down. VFR to MVFR…then 2 miles visibility and a ceiling of 1,200 feet agl.
If the pilot does not possess an instrument rating or is out of proficiency, things can go bad rather quickly. You may even put the learner in and out of the clouds.
- READ MORE: Cirrus Adds Second Vision Jet Simulator
In this scenario, the options are a 180-degree turn using only rudder to avoid overbanking—common when you lose the outside horizon reference—to get back to VFR conditions or contacting ATC to ask where the nearest VFR is.
Focus on basic attitude flying using the attitude, airspeed, and heading indicators, or the backup instrument(s). If the aircraft the learner flies in the real world has an autopilot and the ATD has one, teach the learner how to use it. Put the aircraft in level flight to give them a moment to consider their next course of action so they are not anxiously doing climbs, descents, and unplanned turns.
If the learner is not instrument rated but is training at an airport with an instrument approach, this might be a great time to teach them how to fly the approach as an emergency measure. It just might entice the learner to pursue an instrument rating as it will provide extra skills to address this situation and allow them to legally fly in the clouds.
Scenario 4: Crosswinds
If only flight instructors could control the weather, we’d have the learners practicing crosswind takeoffs and landings on a regular basis. But as we can’t in the real world, we set up the ATD for those scenarios, starting with the limitations used for recently soloed learners. It might be no greater than 6 knots with gusts to 10 mph. Usually that limitation is lifted as the learner gains more experience as a pilot. In the ATD, you can change angle with a keystroke, so the learner can experience winds variable between a 45- and 90-degree angle to the flight path.
The demonstrated crosswind component of the aircraft, as noted in the POH for the make and model, should be discussed, and then you can have the student attempt to fly it. Then the CFI should increase the winds so they are 10 knots (or more) above the demonstrated crosswind component.
You might even increase them gradually while having the learner fly the pattern at the airport. If the approaches turn into go-arounds, suggest the learner head to the nearest airport with a crosswind runway, computing the time en route and perhaps getting flight following—the CFI plays ATC at this point. It is important to discuss decision-making in this scenario, and sometimes pilots become so fixated on trying to land that they end up fighting the airplane—or, in this case, the sim when the best course of action is to go to another airport with a more suitable runway alignment.
Scenario 5: Practice Navigation
Getting lost is one of the major phobias of many fledgling pilots. Depending on how sophisticated the ATD graphics are, they can be an excellent tool for teaching basic navigation. Start by having the learner use the compass and teaching UNOS (“undershoot north, overshoot south”) and ANDS (“accelerate north, decelerate south”). Once that is grasped, get sneaky and fail the heading indicator.
Next, introduce the VOR. For this, it is beneficial to pause the device and walk through TIMS: tune it in, identify it by the Morse code, monitor it (listen to the code twice), and then finally set it so the needle centers up with a “From” indication. Why “From”? Because that’s how most of us process geographic relationships. If you asked someone about the nautical-mile distance between Oshkosh and Green Bay in Wisconsin, the answer would be “Oshkosh is 37 nautical miles from Green Bay.”
With a few keystrokes, the CFI can reposition the learner. Have them use the VOR to determine what radial they are on, and if the unit has DME, show you where they are on a sectional. For an extra level of challenge, reposition the virtual airplane and have the learner use the VORs to determine where they are using triangulation.
I don’t allow the learners to use the GPS in the airplane until they’ve learned the other means of navigation. I do not want them to become slaves to the magenta line, but that being said, the use of GPS is critical as you want to avoid the random panic pushing of buttons.
You will see this tendency in the ATD as well, but in the sim you can pause the action then discuss what the learner is trying to accomplish and go through the steps to find the menus and pages.
This is a lesson that should not be rushed. Have the learner go through a flight from start-up to shutdown using the GPS. Note the appropriate checklists, check RAIM if doing instrument approaches, note aircraft performance, and build flight plans. The idea is to learn the procedures in the controlled environment of the ATD, so when the learner gets into the faster-paced, less-forgiving aircraft, they will have a better chance of staying ahead of the airplane.
Remind the learners that GPS is much more than the “Direct To” key, because the direct key and the magenta line will put them through a mountainside or airspace requiring a clearance, so they best have their wits about them and maintain situational awareness.
The Ultimate IFR Scenario
Preparing a learner for their instrument check ride is much more than having them fly a particular profile under a view-limiting device. You’re supposed to be trained for the real world, with all the challenges and decisions that come with it. Do this with a scenario—the difference between a scenario and practice is that, when doing a scenario, the pause button is not allowed. You can’t do it in the airplane, so you can’t do it in the ATD.
This throws down a gauntlet of challenge.
The CFI plays ATC during this scenario, giving the learner their clearances and fielding requests, just as ATC does. Keep it realistic.
Do that in the ATD first by having the learner plan a cross-country flight in it and launch in MVFR but on an IFR flight plan. When they are just about at their destination, the airport is closed—maybe there is a disabled aircraft on the runway—what are the pilot’s options? Should they hold? Divert? The CFI should be prepared for anything, including the random instrument failure.
A Word About Emergencies
It’s a good idea to occasionally drop in a few emergencies during practice or scenarios but not to do them every time. That’s not realistic, or if it is, find a different flight school because that one has serious maintenance issues. There are also some emergencies I file under “I Hope You Never Need to Know This.”
The first one is the jammed elevator. Teach the learner to control the aircraft’s pitch attitude using throttle and trim, and to make the mother of all straight-ins. I compare this maneuver to knowing CPR—I hope I never have to use it, but I am glad I know how to do it.
When we practice a loss of engine power and emergency landing in the real world, we’re usually within gliding distance of an airport. We do clearing turns, identify the emergency landing area, then the maneuver commences. If only the real world was that predictable.
It can be very beneficial for the learner if the CFI fails the engine when the learner is not near an airport—where will they go? Into the trees? Are they over a beach? Can they make it to that grass strip the GPS says is 1.5 miles away? This is an exercise in decision-making. It may be a no-win scenario, or they may be that guy that puts it down in the farm field then lives to share the story.
And one more note about pacing: Some ATDs have the option to change the speed of the scenario. You can make it slow to allow the learner more reaction time, or you can speed it up to create a more challenging experience. If the learner is having difficulty staying ahead of the action, slow it down. If they are ready for a challenge, speed it up.
For best results, always use a syllabus and have an objective when you use the ATD. Finally, make sure you brief the lesson, just like you would in the airplane. Discuss how the scenario will be achieved—and let learning take place.
This column first appeared in the March 2024/Issue 946 of FLYING’s print edition.
The post Flight Sims for the Win: It’s All About Repetition and Drill appeared first on FLYING Magazine.
]]>The post How to Make Sure Your Cross-Country Hours Count appeared first on FLYING Magazine.
]]>Is there a particular way the FAA wants the pilot to measure distances, navigate, and pick a route?
Answer: According to FAR 61.1(b)(ii), to meet the aeronautical experience requirements for a private pilot certificate, a commercial pilot certificate, an instrument rating, or for the purpose of exercising recreational pilot privileges, cross-country flight time must include a landing at least a straight-line distance of more than 50 nm from the original point of departure. Measure that with a plotter and paper sectional, and it’s best if the distance is a bit past 50 nm—like at least 53 nm.
As far as navigation goes, FAR 61.1(b)(i) navigation for cross-country flights can be ded reckoning, pilotage, electronic navigational aids (GPS), radio aids (VOR), and other navigation systems. Keep in mind that many designated pilot examiners (DPEs) will fail the GPS or ForeFlight to test the applicant’s use of the more basic navigational skills.
Pro tip: Carry a current paper sectional with you and make sure you can read it. Andexpect to be told to divert to another airport during the check ride using the sectional as your guide.
As far as if it is legal to reposition an aircraft to an airport that is not a pilot’s home base, then use it as a starting point to give them a straight-line distance of more than 50 nm, we asked the FAA directly. The answer: Yes, it is legal to do this.
The post How to Make Sure Your Cross-Country Hours Count appeared first on FLYING Magazine.
]]>The post Jeppesen NavData Turns 50 appeared first on FLYING Magazine.
]]>According to the company, an estimated 90 percent of the aircraft in service at this time rely on JeppNavData from the Digital Aviation Solutions group of Boeing Global Services to get them where they need to be.
“Jeppesen NavData has been at the heart of aviation navigation for decades, evolving not just in step with the industry but often ahead of it,” said Brad Surak, the company’s vice president of digital aviation solutions. “It is our proud legacy to have contributed to the digital transformation of flight navigation. This anniversary is a testament to the pioneering spirit that continues to guide our path forward.”
The History
The company began in the 1930s when Captain Elrey Jeppesen, an airline pilot, jotted down notes and drew diagrams in a small black notebook. These notes contained information about the airports he visited and highlighted, among other things, the location of prominent landmarks, like railroad tracks and the height of water towers and their location in reference to the airport.
United Airlines, the employer ofJeppesen, was the first to use Jeppesen charts, or “Jepps” as pilots call them.
In 1947 Jeppesen and the Civil Aeronautics Administration (the precursor to the FAA) collaborated to create standard instrument approach procedures and the National Flight Data Center.
The company continued to grow and evolve, serving nations outside the U.S., and in 1973 Jeppesen NavData was used commercially in flight management computer guidance systems.
Jim Terpstra, a pioneer of Jeppesen data services, tells the story.
“The NavData department began with two guys in 1973,” Terpstra said. “Once every 28 days, the computer department created a magnetic tape with the latest information, and I would pack it in a box and we would deliver it to customers.”
According to Terpstra, the first commercial flight using the Jeppesen NavData digital navigation system was a National Airlines DC-10 in 1973.
The 28-day cycle of digital information is still utilized today. According to Jeppesen, the data powering Jeppesen Data Solutions is created and refined from raw source information from more than 246 global providers in 195 countries as well as information from regulatory agencies.
More than 1,000 experts are tasked with transforming the raw data into a consistent format that pilots can use. The company noted that “each cycle, the team turns raw data into refined, consistent flight information by analyzing and verifying more than 47,000 pieces of data.”
- READ MORE: Two Kinds of Instrument Approach Charts
Delivery Method Has Changed
Over the decades as digital media has evolved, so has the data delivery method. Magnetic tape gave way to floppy disks, and now pilots receive real-time updates via wireless transmissions that can be easily integrated with advanced flight management systems in a variety of aircraft.
Although ostensibly developed for airlines, Jeppesen NavData is also used by the military and flight schools around the world.
“Every update of NavData reflects our relentless pursuit of excellence in aviation,” said Brett Burgess, the company’s digital aviation solutions leader. “We’re shaping not just routes in the sky but the future of global air travel.”
The post Jeppesen NavData Turns 50 appeared first on FLYING Magazine.
]]>The post How Do Airliners Navigate the North Atlantic? appeared first on FLYING Magazine.
]]>Gone are the days of navigating with a sextant. Until the early 1980s, my former airline actually utilized a sextant viewing port aboard the Boeing 707 as a secondary means of verifying position. This remained until the airplane was retired from service. Even inertial navigation systems (INSs) have virtually become extinct. Today, inertial reference systems (IRSs) that include laser-ring gyros operate within three separate onboard inertial reference units (IRUs).
Position data from the IRUs is combined with GPS position, VOR position, and DME position. The combined data is processed by two separate flight management computers (FMC) that communicate with each other to provide a more accurate real-time position in addition to numerous other complex functions.
Failures are rare, but the IRS is capable of navigation with only one IRU and one FMC, albeit on a restricted basis that does not allow for low visibility approaches because of accuracy degradation.
The post How Do Airliners Navigate the North Atlantic? appeared first on FLYING Magazine.
]]>The post Garmin Updates D2 Watch Series with Mach 1 Pro appeared first on FLYING Magazine.
]]>FLYING had the opportunity to preview the D2 Mach 1 Pro at NBAA-BACE last week in Las Vegas, and we’ve also brought one home to test further for a full report. Our first impression? Improving upon the substantial feature set was a challenge, but a few key elements make it compelling to consider. Among these are:
- An LED flashlight incorporated into the case—and positioned so that you can wield it, communicator-style, during all phases of flight, from preflight to postflight. A red lens makes for safe use in night ops.
- A red shift mode for the display itself, also supporting night flight use.
- Improved battery life, which varies with the type of use, but can last up to 46 hours in pilot mode, and 25 days as a smartwatch.
- An ECG app adds to other health and fitness features to allow users to record heart rhythm for any signs of atrial fibrillation (AFib), up to a 30-second recording that can be viewed on the watch as well as on the Garmin Connect app.
- READ MORE: Garmin Unveils Latest Smartwatch for Pilots
“This year marks 10 years of the D2 series—a smartwatch line that pilots have relied on to combine aviation tools with the latest smartwatch technology,” said Carl Wolf, Garmin’s vice president of aviation sales and marketing, in a statement. “The D2 Mach 1 Pro provides an extensive set of advanced capabilities that pilots use every day, all while touting battery life that can withstand even the long-haul commercial pilot trips. Features like the LED flashlight and large AMOLED display, combined with the high-end materials, make this the most premium-built D2 smartwatch yet.”
The striking 51 mm case is crafted with a titanium bezel and five-button stainless steel design to access features quickly. It can be worn with a wide range of bands, from metal to leather to nylon fitness versions.
Pilot Modes
The D2 Mach 1 Pro builds on the pilot applications launched with earlier models, including the ability to plan, execute, and record flights through each stage. The watch allows access to a worldwide aeronautical database, a horizontal situation indicator (HSI), direct-to navigation, and a moving map display—all while offline. Aviation weather data and custom reports and alerts are available as well as fuel planning. A wrist-based pulse oximeter allows you to monitor oxygen levels, and a barometric altimeter provides altitude alerts.
The watch begins flight tracking and logging on takeoff, and it will sync the flight data to the user’s flyGarmin.com logbook. Flight plans can be uploaded directly using the Garmin Pilot app—and those pilots flying aircraft with PlaneSync can view the aircraft dashboard for fuel, electrical, database, and location information while away from the airplane.
The D2 Mach 1 Pro comes standard with a vented titanium bracelet with carbon gray DLC coating as well as a black silicone band for a suggested retail price of $1,399.99.
The post Garmin Updates D2 Watch Series with Mach 1 Pro appeared first on FLYING Magazine.
]]>The post GPS Spoofing Raises Alarms appeared first on FLYING Magazine.
]]>Someone in the Middle East has figured out how to spoof GPS data and it’s playing havoc with aircraft navigation.
OPSGROUP, a site used by airline, business and cargo pilots, is reporting that aircraft using Airway UMB688 in northern Iraq are experiencing complete navigation system failures because the hacker replaces the position data beamed by the GPS signals with false coordinates.
“[Twelve] separate reports have been now received by OPSGROUP, and in most cases the [Inertial Reference System] becomes unusable, VOR/DME sensor inputs fail, the aircraft UTC clock fails, and the crew have been forced to request vectors from ATC to navigate,” the site reported.
OPSGROUP says all of the aircraft involved have state-of-the-art navigation systems and include a range of Boeing, Gulfstream, Dassault and Bombardier aircraft. The publication stressed that this is not ordinary GPS jamming, which is a common occurrence in the area.
The attacks have all been the same so far. The specific GPS receiver on a single aircraft is sent a signal that shifts the displayed position by 60 nautical miles. The aircraft’s nav systems freak out at the sudden change in data and in almost all cases the screens become useless. Crews then have to call ATC for vectors to stay on course.
The publication says the loss of precise navigation data is especially dangerous in that area because of military action and the proximity of Iranian airspace, entry to which will likely prompt a military intercept.
The post GPS Spoofing Raises Alarms appeared first on FLYING Magazine.
]]>The post Math 101 for Pilots appeared first on FLYING Magazine.
]]>Since you can’t or shouldn’t have your head buried in a calculator when you are flying, it behooves you to be able to do some quick math in your head.
Calculating Reciprocal Course
Let’s start with an easy one: determining the reciprocal course.
For example, the airplane is flying a heading of 030. You need to fly the reciprocal, and
the only navigational aid you have is the whiskey compass. Add 200 to 030
(200 + 30 = 230), then subtract 20 because the reciprocal is 180 degrees off the initial heading. You need to fly 210.
Determining Bank Angle for a Standard Rate Turn
I learned this one from a World War II aviator. To calculate the bank angle for a standard rate turn, take the indicated airspeed, divide it by 10, then add five to the value. For example, if the indicated airspeed is 100 knots/10 = 10 + 5 = 15 degrees. Verify this with the attitude indicator and the turn coordinator the next time you fly.
Time to Climb
Presuming that climbs will be made at 500 fpm, subtract present altitude from target altitude then divide by 500.
For example, the airplane is at a traffic pattern altitude of 1,500 feet msl. The target altitude is 5,500 msl. 5,500 – 1,500 = 4,000. Divide 4,000/500 fpm = 8. It will take approximately eight minutes to get to target altitude.
Descent Rate
Although we’ve never had an airplane stay stuck up there yet, you don’t just pull the throttle back and let gravity take over during a descent.
Descend to pattern altitude too soon, and you might put yourself in a risky position should there be an uncommanded loss of engine power when you are beyond gliding range to the airport. Delay the descent and you’re behind the airplane, fighting to slow down and get down. Planning is key. You need to determine when to start your descent and the rate of descent.
The Math Behind a Stabilized Descent
Three degrees is the usual angle of descent—when you look at an instrument approach plate and note a descent angle greater than 3 degrees, you can expect an obstacle in the path.
The time of descent is based on ground speed. In addition, you need to determine the rate of descent.
There are a few ways to determine this:Take your ground speed, divide it in half, and add a zero to the end to determine how many feet per minute you need to get stable descent.
For example, if your ground speed is 100 knots, divided in half that gives you 50—add another zero, and you get 500 fpm.
Either refer to the POH or experiment to determine the appropriate power setting and pitch to achieve this. If you pursue an instrument rating, this is a skill you will need because a stabilized constant rate descent will keep you on a glide slope. For VFR pilots, a stabilized descent keeps you on the PAPI or VASI.
Although there are apps that will do these calculations for you with the push of a button, it’s a good idea to practice them every now and then to make sure you don’t forget how. If the avionics go Tango Uniform or the portable electronic devices overheat in the cockpit—we’ve all been there—you will be happy you remember.
The post Math 101 for Pilots appeared first on FLYING Magazine.
]]>The post New ForeFlight Safety Update Includes Runway Alert appeared first on FLYING Magazine.
]]>The flight planning app’s new aircraft on-runway feature provides critical warning systems by notifying pilots on final approach if there is an airplane on the runway upon which they intend to land. The feature also warns the crew of the aircraft on the runway that another is approaching. For the function to work, aircraft must be connected to an ADS-B or FLARM, or “flight alarm” receiver.
The updates emerge as reports of serious runway incursions have become more frequent amid an increase in air traffic congestion and understaffing at key ATC facilities. A number of near-miss events—including episodes at Austin-Bergstrom International Airport (KAUS) and New York’s Kennedy International Airport (KJFK)—made headlines earlier this year, leading to calls for aviation system safety improvements. In response, the FAA held a safety summit in March to discuss ways to mitigate incursions. The agency also awarded more than $100 million to a dozen airports to help prevent such incidents from occurring in the future.
According to FAA data, an average of three to four incursions occur daily in the U.S. Confusing runway markings and airport signage, and runway or taxiway layout are among the risk factors contributing to problems. The agency also found that roughly 65 percent of all runway incursions are caused by pilots, of which general aviation pilots account for 75 percent.
ForeFlight’s aircraft on-runway alerts aim to provide pilots with more situational awareness.
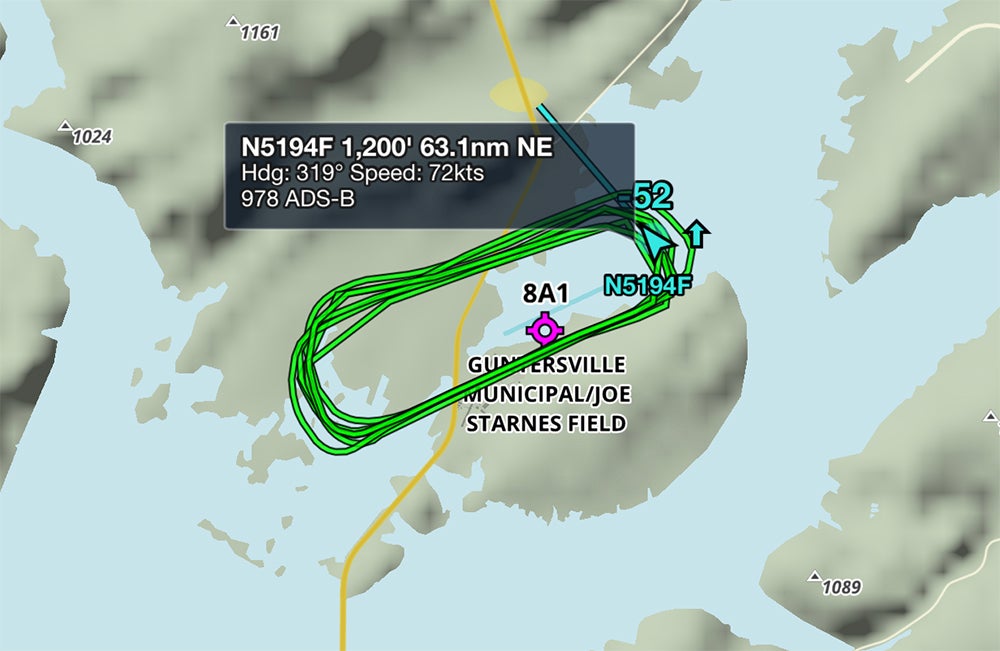
In addition to the runway alerts, ForeFlight has introduced ADS-B traffic breadcrumbs, allowing pilots to check the recent flight paths of nearby aircraft to see which runways and procedures are in use. Users can tap any airborne or grounded aircraft to see its trail in green along with information about the target. ForeFlight has also added a new day/night overlay feature, so users can see where night has fallen around the world as well as the real-time day/night boundary right on the map.
All plans may utilize the new aircraft on-runway and day/night overlay features. However, a Pro Plus subscription is required to access the ADS-B traffic breadcrumbs.
The post New ForeFlight Safety Update Includes Runway Alert appeared first on FLYING Magazine.
]]>The post Air Force Demonstrates New Magnetic Navigation System appeared first on FLYING Magazine.
]]>The event marked the first successful demonstration of the technology known as MagNav on a Department of Defense aircraft, the Air Force said. The technology is meant as a backup in case GPS navigation is disrupted by jamming or other countermeasures.
For the demonstration, members of the AIA MagNav team, with personnel from MIT, the MIT Lincoln Laboratory, Air Force Research Laboratory Sensors Directorate and, the Air Force Institute of Technology Autonomy and Navigation Center flew three sorties in the C-17 to Edwards Air Force Base in California during an exercise in May called “Golden Phoenix.”
To aid navigation, the teams used a neural network architecture that tracks the aircraft’s position based on a magnetic map while removing magnetic noise from the aircraft. The network had to be “trained” during flight using machine learning and artificial intelligence. The 60th Air Mobility Wing provided the aircraft used to assemble and train the MagNav prototype.
“Every pilot fears single points of failure,” said Maj. Kyle McAlpin, the AIA MagNav liaison. “Our strategy documents lament the DOD’s overreliance on GPS, a single point of failure in our ability to navigate precisely. The next fight demands unassailable positioning and navigation. We can achieve that by augmenting GPS with alternatives like celestial navigation, signals of opportunity, visual navigation, and magnetic navigation.
“This week, we took an important step towards making one of those modalities a reality by transitioning MagNav from the minds of MIT and MIT Lincoln Laboratory onto an operational aircraft, blazing the trail for our sister services and expansion to new platforms.”
The Air Force said the collaboration between AIA, MIT, MIT Lincoln Laboratory, and other partners “paves the way for further innovation in navigation technologies, benefiting not only the Air Force but also the broader aviation community.”
The post Air Force Demonstrates New Magnetic Navigation System appeared first on FLYING Magazine.
]]>The post Nassau, Bahamas ILS 14 (MYNN) appeared first on FLYING Magazine.
]]>A. Transitions From En Route To Approach
HINZY, MAJUR, MELON, and KURAY are all waypoints from which this approach might be started, which then transitions into the MUNIE waypoint. All of these waypoints are also found on low-altitude en route charts and are on victor airways that might be used to transition en route to the ILS Runway14 approach into Nassau. A pilot planning ahead might choose their en route path to transition to one of these points. One of the most commonly used is the MAJUR intersection, which falls on BR22V-54V-57V, a victor airway that transitions off from the Palm Beach (PBI) VOR, taking the pilot from the East Coast of the U.S. into the Bahamas with the help of Miami Approach.
B. DME Arc
A pilot choosing to transition onto this approach from either the HINZY or KURAY intersection might find themselves assigned a DME arc. While not as common in many locations as in the past, an arc such as this can be used by ATC to sequence traffic from multiple points onto a final approach path, as in this ILS Runway 14. Remember to use the turn-10, twist-10 (degrees) process to feed onto the approach while flying the 14 DME arc from the ZQA VOR until intercepting the final approach path of 143 degrees inbound on the ILS. For many pilots, an IFR-capable GPS can select the initial fix and help feed the aircraft around the DME arc. Don’t forget to make the ILS frequency active and switch to VLOC when flying this approach, though, if you are using the GPS to feed your aircraft from the initial fixes onto the final approach path.
C. Mixing With Big Aircraft
With many different aircraft of various sizes and speeds using this approach, be ready to mix it up in the airspace. With that said, you may be asked to maintain your aircraft’s best forward speed; to be vectored around a little bit if there are bigger aircraft needing to land; or to get out of the way quickly when landing. With an airport with runways of over 8,000 and 10,000 feet of landing distance, Nassau brings in big aircraft to use the facilities. You might be flying your GA aircraft on the approach between a Gulfstream ahead of you and a Boeing 787 behind you. Be honest if you can’t maintain something assigned to you. It’s certainly better than getting run over by a faster aircraft.
D. DME From the ILS
While a pilot using a traditional DME source will be using the ZQAVOR (112.7) for DME fixes, if using an intersection or the DME arc to feed onto this approach, they will need to transition to using the DME on the ILS frequency (110.1) once they pass the IZQA waypoint (the final approach fix). This can be confusing because prior to this, the pilot would be using the VOR. They need to swap the frequency for the DME source to the ILS (as denoted by the D6.9 IZQA notation at the final approach fix) for the last part of the approach.
E. Correct GPS Database?
GPS systems in aircraft have databases that include approach procedures for selected areas. Make sure if you are going here and planning on using approaches at all—anything beyond basic VFR—that your database subscription is not only current but includes the places you want to go. A subscription for a database that includes “United States” might include Puerto Rico, but not the Bahamas. A subscription for “North America” might be needed to get the right data. Verify this well ahead of your trip or plan on being a VFR-only operator for your time in the Bahamas.
This column was originally published in the December 2022/January 2023 Issue 933 of FLYING.
The post Nassau, Bahamas ILS 14 (MYNN) appeared first on FLYING Magazine.
]]>